

How to Install the Parking Sensors Correctly?
PARKING ASSIST SYSTEM
An ultrasonic parking assist system is designed for use on the bumpers of
most cars. This system detects any objects or people behind the vehicle using (4)
ultrasonic sensors that are mounted in the rear bumper and warn the driver of the distance to
the objects through a LED display and audible tones. The driver can then judge the
distance and use caution when backing up the vehicle. You can buy them painted or unpainted.
SENSORS IN THE COLOUR?
You can buy them painted or unpainted. You can paint them if you wish, but it’s advisable to only use a light coat. (paint them before installing). Please make sure, you will only use original car body paint, as the coat of the paint is much lighter than other paints. Remember to prepare the sensors before painting. You can use only the extra finest sandpaper slightly to avoid any possible damage to the sensors.
HOW TO INSTALL THE PARKING SENSORS CORRECTLY?
1. At first, you have measured out the distance across the bumper and try to space the sensors equally apart. Space the sensors at least 1 -1.5 feet apart from each other if you are installing (4) sensors and 2-2.5 feet apart from each other if you are installing (2) sensors. The height of the sensors should be at least 1.5 – 2.5 feet from the ground to the sensor but no less than 1.5 feet.
If your measurements come in a little over the specified height or width than that’s fine just as long as the sensors are not spaced too close together or too close to the ground.


2. Use the provided hole saw bit to drill the holes in the bumper. This hole saw bit should give you an adequate sized hole to fit the sensor perfectly. Once you have the holes drilled, route the sensor cables through the holes and snap the sensors into place.
If the sensor fits too tightly into the hole then try to drill the hole just a little bit wider but not wide enough to where the sensor is very loose. If the sensor is too tight, the system may not function properly. If the sensor is loose, DO NOT apply any kind of adhesive or silicone to hold it in place. See our troubleshooting section for more details.
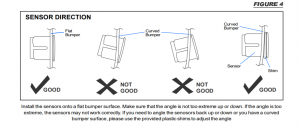
3. When placing the sensors into the bumper, it is important to note how they should fit into place. Always try to put the sensors on the flattest part of the bumper surface aiming straight out behind the vehicle. If the sensors are angled slightly downward on the bumper than that is okay just as long as they are not angled extremely up or down in direction. If the sensors are angled too far downward, then they will pick up the ground the system is on and cause false warnings. If the sensors are angled too far upward, then they will not pick up anything because they are aiming at the sky and this will cause the system to fail.
If you run into an issue during the install where you need the sensors to be angled back up or down or the bumper surface is slightly curved or uneven, then you can use the provided plastic shims to angle the sensors the way you need them or to compensate for the
uneven bumper surface.
INSTALLING THE SENSOR CABLES
1. Route the cables into the trunk panels of the vehicle either by drilling and hole or using a pre-existing rubber grommet. If you have the drill a hole, make sure to seal the hole once the installation is complete to prevent leaks and keep out any other weather elements. If installing on a truck, route the cables underneath the bed of the truck. Please make sure to avoid any moving parts like the suspension or axels. You may be able to locate a
factory wire harness that you can zip-tie the cables to and route them the whole length of the truck following the factory wire harness.
Try to avoid running the sensor cables next to any high-current power wires or electrical devices in the vehicle as this may cause false sensor warnings during the operation of the system.
2. Zip-tie the sensor cables together the run them down the length of the vehicle.
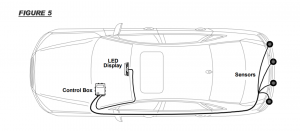
INSTALLING THE CONTROL MODULE
1. Mount the control module under the vehicle dashboard or behind the trunk panels in the rear of the car somewhere out of the way. There are two methods for installing the control module. One way is by using the provided metal mounting bracket which snaps into the side of any one of the 3 claps on the side of the module. The other method is to use the supplied 3M double side tape and stick the module down to the surface. If using the 3M tape method, make sure to clean any dust or dirt from the mounting surface before applying the tape.
Some installers prefer to mount the control module in the trunk panels instead of underneath the dashboard. This is okay to do, but please make sure that the module is clear of any moisture or excessive vibration in the trunk. If installing the module under the dash, please make sure to keep it clear of any moving parts such as the steering column or pedals. This way you can avoid getting the sensor and display cables caught or pinched after the installation is complete.
2. Connect the sensor cables into the control module. The sensor ports on the module are labelled A, B, C and D which corresponds to the sensors which are also marked A, B, C and D. Please make sure to plug in the correct sensor to the corresponding sensor port.

When the vehicle is shifted into reverse, the system will activate. The LED display will illuminate and sound off to let you know the system is active. The system will not sound or display again until sensors pick up any objects or people that come into the detection range.


SHOP NOW FOR THE BEST SELLING PARKING SENSORS KIT IN OUR STORE CLICK HERE